When you need to connect to several servers because you need to share, update or syncronize a set of files, a common situation is authentication process with the server, if you do this several times in a day, it could be a little hard to type or input your password every time that you are connecting, so, for this reason today I would like to explain how to configure your machine in order to have an authentication based on RSA keys, on this way, no password will be required anymore (an UNIX-like operating system is required, it doesn’t apply for windows, sorry).

Preparing client
First, be sure that you have generated your private and public keys in your CLIENT MACHINE, to do this you can use next command:
ssh-keygen -t rsa
This command will generate a new directory in your home folder called .ssh as you can see it is a hidden directory, inside of it you can find at least next files:
Use next command to go to your home folder:
cd ~
If you want to list all files -included hidden files- just type (see figure 1):
ls -la
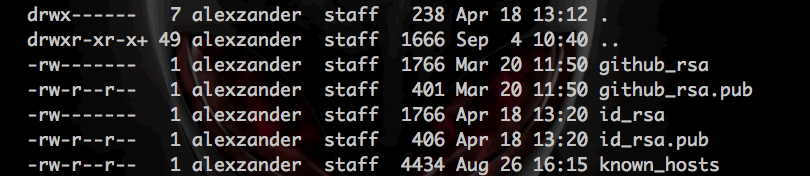
Figure 1. An example of ls -la command.
If you can’t see all these files, don’t worry, at least you should see next two files:
- id_rsa. This file saves your private key (you must NOT share this key is only for you).
- id_rsa.pub. This file contains your public key (you can share this key with all your “server-friends”).
Configuring server
Now, it is time to prepare your server to allow access using public keys authentication.
1) Go to next directory: /etc/ssh/
cd /etc/ssh/
2) Back up the file called sshd_config (to save the original file, just in case you have a configuration error and you need to return to previous configuration). This file contains configuration used by SSH service.
cp sshd_config sshd_config_backup
3) Open sshd_config file:
nano sshd_config
4) Inside of it try to find next lines, in case they don’t exist you can add at the end the file:
PubkeyAuthentication yes
AuthorizedKeysFile      %h/.ssh/authorized_keys
- First line allows the use of public keys to authentication.
- Second one specifies where the public keys will be stored.
5) Save and close the file (press Ctrl + O to save and Ctrl + X to close).
6) Now, we will add our public key to authorized_keys file, to do this, open this file (it usually is in ~/.ssh/authorized_keys, in case it doesn’t exist you can create it).
nano ~/.ssh/authorized_keys
7) Next, this is too important: you MUST copy YOUR public key, this key is in YOUR COMPUTER in the file id_rsa.pub (generated with ssh-keygen at the beginning of this post). You will need to open your id_rsa.pub file, copy its content and paste at the end of the authorized_keys file in the SERVER (if you want you can backup authorized_keys before adding your public key).
8) To see this changes you must restart SSH service:
- CentOS / RHEL / Fedora / Redhat Linux Restart SSH
/etc/init.d/sshd restart

OR

service sshd restart
- Debian / Ubuntu Linux Restart SSH
/etc/init.d/ssh restart

OR

service ssh restart
- FreeBSD Restart SSH
/etc/rc.d/sshd restart
9) Close your current SSH connection.
exit
10) Finally, to test all your configuration, just try to enter to the server and you should enter without password!
That’s it!
Be happy with your servers.
—